How to Start n8n (Beginner Guide): Your First Automation Step-by-Step
Automation can save you hours every week—whether you’re running a business, managing clients, or building online projects. If you’re new to n8n, this guide will help you start from zero and build your first workflow confidently.
n8n is a powerful workflow automation tool that lets you connect apps (like Gmail, Google Sheets, WooCommerce, Slack, Telegram, and more) and automate repetitive tasks without writing complex code.
In this beginner guide, you’ll learn:
What n8n is and how it works
The easiest ways to install and start n8n
How to build your first workflow (step-by-step)
Common beginner mistakes to avoid
What to do after your first workflow is live
What is n8n?
n8n (short for “nodemation”) is an automation platform where you create workflows using visual blocks called nodes.
A workflow usually has 3 parts:
Trigger – starts the automation (Webhook, Schedule, Form, New Email, etc.)
Actions – what should happen (send message, create row, update CRM, etc.)
Logic – filters, conditions, branching, loops, and data mapping
The best part? You can start simple and then grow into advanced automations.
Why Use n8n Instead of Zapier?

n8n ready workflow
Many beginners compare n8n with Zapier or Make.com. Here’s why people love n8n:
✅ More control over workflows
✅ Supports complex logic (if/else, loops, data manipulation)
✅ Can be self-hosted (no high monthly cost)
✅ Great for developers and non-developers
✅ Large community and hundreds of integrations
If you want automation that scales, n8n is a strong choice.
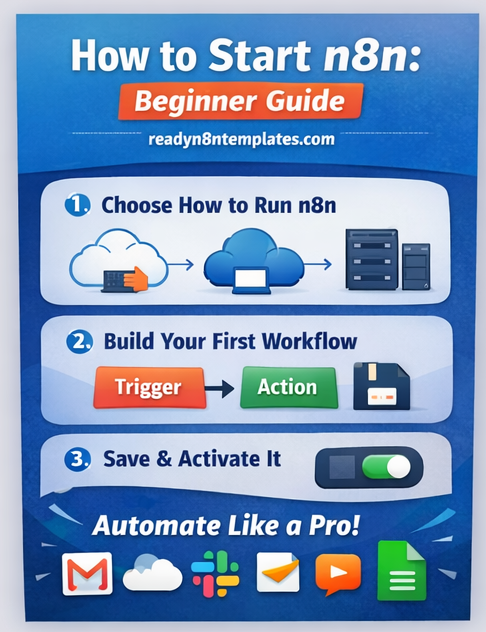
Step 1: Choose How You Want to Run n8n
There are 3 common ways beginners start n8n:
Option A: n8n Cloud (Easiest)
Best if you want to start quickly with zero setup.
Sign up to n8n cloud
Log in
start your n8n ready project
Start building workflows instantly
✅ No server needed
✅ Works from anywhere
❌ Monthly cost
Option B: Run n8n on Your Computer (Local)
Best for learning and testing.
You can run it locally using:
Desktop app (if available for your OS)
Node.js method
Docker (recommended if you know a bit)
✅ Free for learning
✅ Safe for testing
❌ Needs your PC running
Option C: Self-Host on VPS (Best for Serious Use)
Best if you want 24/7 automation.
Install on a VPS
Use your own domain
Keep workflows running always
✅ Full control
✅ Works nonstop
✅ Cheapest long-term
❌ Setup required
Step 2: Start n8n for the First Time (Beginner-Friendly)
If you’re starting for learning, the easiest approach is:
✅ Use n8n Cloud OR run locally
Once n8n is running, you’ll see the workflow editor, which has:
Left side: Nodes list / search
Center: Workflow canvas
Right side: Node settings
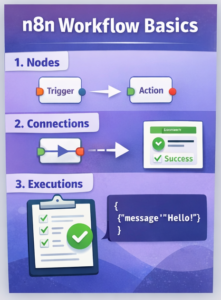
Step 3: Understand n8n Workflow Basics
Before creating your first workflow, learn these 4 basics:
1) Nodes
Each block is a “node” (Trigger node, Action node, etc.)
2) Connections
You connect nodes with lines to build automation flow.
3) Executions
When you test a workflow, n8n creates an execution log.
4) Data Output
Every node outputs data (JSON), and the next node uses it.
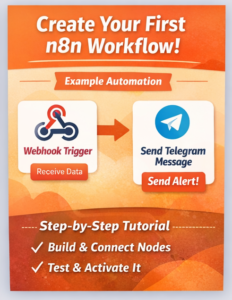
Step 4: Create Your First n8n Workflow (Simple Example)
Let’s build a basic automation:
✅ Goal:
When you receive a webhook request, n8n will send a Telegram message.
This helps you understand triggers + actions quickly.
Step-by-Step:
Step 1: Create a New Workflow
Click New Workflow in n8n.
Step 2: Add a Trigger Node
Search and add: Webhook
Set it to Test
Copy the test webhook URL
Step 3: Add an Action Node
Search and add: Telegram
(Or Email, Slack, Google Sheets—any action you prefer)
For Telegram:
Connect your Telegram bot credentials
Choose “Send Message”
Pick a chat ID
Write message:
“New webhook received!”
Step 4: Connect Nodes
Drag the connection from Webhook → Telegram.
Step 5: Test It
Click Execute Workflow
Now open the webhook URL in your browser or send it via Postman.
If everything is correct, you’ll receive a Telegram message.
🎉 Congrats—your first automation workflow is working!
Step 5: Save & Activate Your Workflow
When you’re done testing:
Click Save
Toggle Active (turn workflow ON)
✅ Active workflows run automatically
❗ In test mode, webhooks work differently—so always activate for real use.
Common Beginner Mistakes (Avoid These)
Here are common problems beginners face:
❌ Not mapping the right data
Each node outputs JSON. You must select the correct fields to pass to the next node.
❌ Forgetting to activate workflow
If it’s not active, it won’t run automatically.
❌ Using “Test URL” webhook in production
Use the Production URL after activating.
❌ Not saving after changes
Always Save—n8n won’t remember unsaved edits.
What to Learn Next After Your First Workflow
Once your first workflow works, the next best steps are:
✅ Schedule workflows (run every day/hour)
✅ Use IF conditions (filter logic)
✅ Save data to Google Sheets / Airtable
✅ Connect WooCommerce / WordPress / Stripe
✅ Use webhooks for APIs and automation
✅ Use “Set” node to format outputs
✅ Learn data transformation (merge, split, loop)
Ready-to-Use n8n Workflow Templates (Faster Than Building From Scratch)
If you want to build faster, you can use ready-made n8n templates that are already tested and structured.
start ready n8n for new
At readyn8ntemplates.com, we provide thousands of ready workflows you can import and customize for your needs—marketing, eCommerce, lead generation, notifications, reporting, and more.