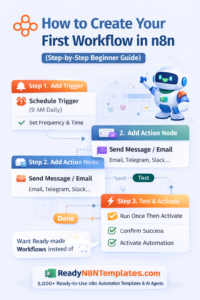
How to Create Your First Workflow in n8n (Step-by-Step Beginner Guide)
If you’re new to automation, n8n is one of the best tools to start with
Create Your First Workflow in n8n (Step-by-Step Beginner Guide)
.
Because it’s powerful, visual, and flexible—yet you can still create your first workflow in minutes.
In this beginner-friendly guide, you’ll learn exactly how to build your first n8n workflow step-by-step, using a simple example you can understand easily.
👉 Want ready-made workflows instead of building from scratch?
Explore 5,000+ ready-to-use automations at www.readyn8ntemplates.com
What is a Workflow in n8n?
A workflow in n8n is a set of steps that run automatically.
It usually includes:
Trigger (starts the workflow)
Nodes (actions that happen)
Execution (one full run)
Example idea:
✅ When something happens → do something automatically
What You’ll Build (Beginner Example)
We’ll build a simple workflow:
✅ Every morning at 9 AM
✅ Send yourself a daily reminder message (example: via Email / Telegram / Slack)
This example is perfect because it introduces:
A trigger (Schedule)
A basic action node
Testing and activating
Step 1: Open n8n and Create a New Workflow
Log in to your n8n dashboard
Click “Workflows” (left menu)
Click “New Workflow”
Give it a name like:
Daily Reminder Workflow
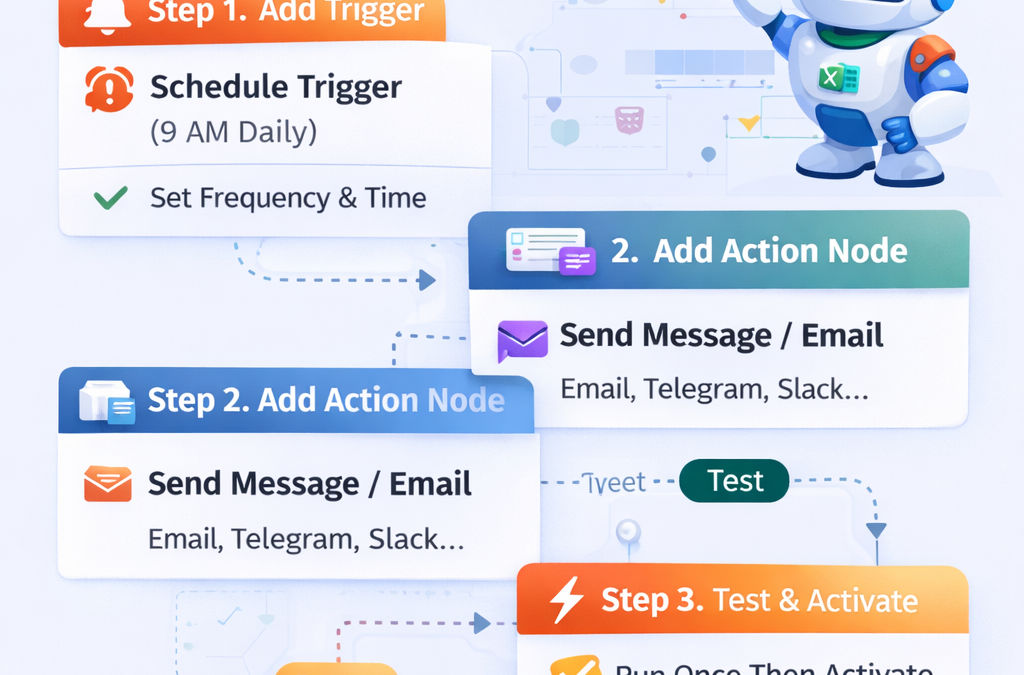
Step 2: Add Your First Trigger (Schedule / Cron)
A workflow needs a trigger to start.
Click “Add first step”
Search for Schedule Trigger (or Cron depending on your version)
Select it
Now set:
Frequency: Every Day
Time: 09:00 AM
Timezone: (choose your correct timezone)
✅ Now your workflow will start automatically every day.
Step 3: Add an Action Node (Send Message / Email)
Now we choose what happens after the trigger.
Click the + icon after the trigger.
Pick one of these beginner-friendly options:
Option A: Send Email (Most Common)
Search Email
Choose Send Email
Add:
To: your email
Subject: “Daily Reminder”
Message: “Today’s plan: finish the important task ✅”
Option B: Send Telegram Message (Very Popular)
Search Telegram
Choose Send Message
Connect your Telegram bot
Write your message
Option C: Slack Message (For Teams)
Search Slack
Choose Post Message
Select channel + message
✅ Your workflow is now:
Trigger → Send Message
Step 4: Test Your Workflow (Run Once)
Before activating, always test.
Click “Test workflow” or “Execute workflow”
Watch if the message is sent successfully
Check Execution Logs if something fails
If it fails, common reasons include:
Wrong credentials
Missing email fields
Incorrect connection
Step 5: Turn On (Activate) Your Workflow
Testing is done ✅
Now activate:
Click “Active” toggle / “Activate workflow”
Save
From now on, it runs automatically at your schedule.
Step 6: Check Executions (Proof it’s Working)
To confirm it runs daily:
Open your workflow
Click Executions
You’ll see:
Success ✅
Failed ❌
Execution time
Data that flowed through nodes
This helps you debug and improve.
Bonus: Make Your First Workflow More Useful (Easy Upgrades)
Once your basic workflow works, upgrade it like this:
✅ Add Google Sheets node → log your daily tasks
✅ Add Notion node → create a daily note
✅ Add Gmail node → send report email to your team
✅ Add OpenAI node → generate a daily summary automatically
✅ Add “IF” node → send a message only on weekdays
That’s how real automations become powerful.
Don’t Want to Build From Scratch?
Many people waste hours building workflows manually.
Instead, you can download proven workflows instantly.
At www.readyn8ntemplates.com
, you get:
✅ 5,000+ ready-to-use n8n workflow templates
✅ AI Agents + Automation Packs
✅ Business automation workflows
✅ Marketing, sales, support, and reporting automations
✅ Copy-paste and run (no expert coding needed)
Final Words
Your first workflow in n8n doesn’t need to be complicated.
Start with:
✅ 1 Trigger
✅ 1 Action Node
✅ Test → Activate
Then you can build bigger workflows step-by-step.
If you want faster results, use ready templates from:
🌐 www.readyn8ntemplates.com